Table of Contents
- Introduction to installation of vinyl flooring in the car
- Gather your materials
- Prepare the car
- Measure and cut the vinyl
- Apply the adhesive
- Lay the vinyl
- Trim the excess vinyl
- Finish the installation
- Maintenance and care
- Conclusion: A Durable and Low-Maintenance Solution for Upgrading Your Car’s Interior
- FAQs for Vinyl flooring in a car
Home » DIY Guide to Installing Vinyl Flooring in Your Car
Introduction to installation of vinyl flooring in the car
Vinyl flooring installation
Installing vinyl flooring in your car can be a cost-effective and durable solution for upgrading your vehicle’s interior. Not only is vinyl easy to maintain and resistant to stains and wear, but the average DIY enthusiast can also install it with the right tools and instructions. This guide will walk you through installing vinyl flooring in your car, from gathering materials to maintaining the finished product.
While some people may be hesitant to do a project like this on their own, the truth is that installing vinyl flooring in a car is a straightforward process that can be completed in a day or two, depending on the size and complexity of your car’s floor plan. With a little patience and attention to detail, you’ll be able to transform the look and feel of your car’s interior and give it a fresh, new lease on life.
Before we dive into the instructions, let’s look at some of the benefits of installing vinyl flooring in your car. Durability is a significant advantage of vinyl, as it is resistant to stains, spills, and wear and tear, making it an ideal choice for busy households or those with young children. Vinyl is also easy to clean and maintain, requiring only a damp cloth and mild detergent to keep it looking new. And compared to other flooring options like carpet or tile, vinyl is generally more cost-effective, making it a budget-friendly choice for car owners looking to make a change.
Now that you have a better understanding of the benefits of vinyl flooring let’s move on to the steps involved in the installation process. With the right tools and a bit of elbow grease, you’ll be able to complete this project on your own and enjoy the results for years to come.
Gather your materials
The first step in installing vinyl flooring in your car is gathering the necessary tools and materials. While the specific list may vary depending on your car and the type of vinyl you choose, there are a few essential items that you’ll need for most installations.
First and foremost, you’ll need the vinyl flooring itself. There are many different styles and patterns available, so be sure to choose something that fits your style and your car’s overall aesthetic. You’ll also need adhesive specifically designed for vinyl flooring, as regular glue or tape may not provide a strong enough bond. A good adhesive will help ensure the vinyl stays in place and doesn’t peel or bubble over time.
In addition to the vinyl and adhesive, you’ll need a few essential tools to help you with the installation process. A utility knife or scissors will come in handy for cutting the vinyl to size, and a roller or similar tool will be helpful for applying the adhesive evenly. A measuring tape will also ensure that the vinyl fits correctly and doesn’t overlap or leave gaps.
While these items are the essentials, there are a few optional tools that may make the installation process easier. For example, a rubber mallet or other soft-faced hammer can be helpful for tapping the vinyl into place and smoothing out any wrinkles or bubbles. If you’re working with a particularly stubborn adhesive, a heat gun may be helpful in activating the bonding agent and improving the adhesion of the vinyl. And if you’ll be spending a lot of time on your hands and knees, it might be worth investing in a pair of knee pads to save your joints from unnecessary strain.
Prepare the car
Before installing the vinyl flooring in your car, you’ll need to prepare the surface by removing any existing floor mats or carpets. This will give you a clean, smooth surface and help ensure that the vinyl adheres properly. You may need to remove some trim or molding in order to access the floor, but be sure to keep track of these pieces and set them aside for reattachment later on.
Once the existing floorings have been removed, it’s important to thoroughly clean and dry the surface. Any dirt, grime, or moisture left behind could interfere with the adhesion of the vinyl and cause it to peel or bubble over time. Thorough vacuuming and wiping down with a damp cloth should do the trick, but you may consider using a commercial cleaner or degreaser if there are any particularly stubborn stains or odors.
Once the surface is clean and dry, consider applying a primer or sealant to help improve the adhesion of the vinyl. While this step is optional, it can ensure that the vinyl stays in place and doesn’t peel or bubble over time. Some adhesives are designed to work with a primer, so follow the manufacturer’s instructions if you decide to go this route.
With the car prepared and the surface ready for the vinyl, you can move on to the next step of measuring and cutting the vinyl to size. By following these simple steps, you’ll be well on your way to a professional-looking installation that will last for years.
Measure and cut the vinyl
Measuring the size of vinyl to put on the car
Once you have prepared the car and gathered all of your tools and materials, it’s time to measure and cut the vinyl flooring to size. This step is crucial to ensure that the vinyl fits correctly and covers the entire floor without overlapping or leaving gaps.
To begin, measure the dimensions of the floor area using a tape measure or a ruler. Be sure to measure the length and width of the space, taking into account any obstructions or irregularities in the shape of the floor. Once you have these measurements, you can use them to determine the size of the vinyl pieces you will need.
With the measurements in hand, it’s time to cut the vinyl to size. Depending on the size of the pieces and the complexity of the floor plan, you may need to cut multiple pieces of vinyl to cover the entire area. Use a straight edge and a sharp utility knife to make clean, precise cuts. If you’re working with a patterned vinyl, be sure to take the pattern into account when making your cuts to ensure that the pieces fit together seamlessly.
With the vinyl cut to size, you can move on to applying the adhesive. Be sure to follow the manufacturer’s instructions for the adhesive, including any necessary drying or curing times. By taking the time to measure and cut the vinyl carefully, you’ll be well on your way to a professional-looking installation that fits perfectly and looks great.
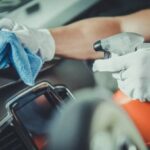
Apply the adhesive
Once the vinyl has been cut to size, it’s time to apply the adhesive and install the flooring. This step is crucial to ensure that the vinyl stays in place and doesn’t peel or bubble over time, so it’s important to follow the manufacturer’s instructions carefully.
To begin, apply the adhesive according to the manufacturer’s instructions. This may involve rolling it on with a roller or similar tool or brushing it directly onto the surface. Be sure to follow any instructions regarding drying or curing times, as the adhesive will need to be set before you can lay the vinyl.
Lay the vinyl
Once the adhesive has been applied and has had time to set, you can begin laying the vinyl. Start at the back of the car and work your way toward the front, smoothing out any wrinkles or bubbles as you go. You may find it helpful to use a rubber mallet or similar tool to tap the vinyl into place gently, but be sure not to apply too much force, or you could damage the vinyl or the adhesive.
As you lay the vinyl, ensure to avoid trapping any air bubbles beneath the surface. If you encounter a bubble, you can use a roller or a similar tool to push it towards the edge of the vinyl gently and release it. If the bubble is particularly stubborn, you may need to lift the vinyl and apply a little more adhesive before laying it back down.
With the vinyl laid, you can move on to the next step of trimming away any excess material around the edges of the floor. By following these steps and taking your time, you’ll be well on your way to a professional-looking installation that looks great and stays in place for years to come.
Trim the excess vinyl
With the vinyl flooring installed, the next step is to trim away any excess material around the edges of the floor. This will give the finished product a clean, professional look and help to ensure that the vinyl stays in place and doesn’t curl or lift over time.
To begin, use a utility knife or scissors to carefully trim away any excess vinyl around the edges of the floor. Be sure to hold the blade at a shallow angle to avoid cutting into the floor itself, and take care to make clean, precise cuts. If you’re working with a patterned vinyl, pay attention to the pattern and try to match it up as closely as possible as you trim.
Finish the installation
Once you have trimmed away the excess vinyl, you can move on to the final step of finishing the installation. This may involve replacing any trim or molding that was removed during the preparation process, as well as allowing the adhesive to dry completely before replacing any floor mats or driving the car.
By following these simple steps and taking your time, you’ll be able to complete the installation process and enjoy the benefits of a new vinyl floor in your car. Whether you’re looking to upgrade the look of your car’s interior or want a more durable and easy-to-maintain flooring option, vinyl is a great choice that is well worth the investment.
Maintenance and care
Now that you’ve installed your new vinyl flooring, it’s important to take steps to maintain its appearance and longevity. With a little care and attention, your vinyl floor can continue to look great and serve you well for years to come.
One of the key things to remember when it comes to maintaining vinyl flooring is to clean it regularly. A simple sweeping and damp mopping with mild detergent is usually all that is needed to keep your floor looking its best. Avoid using harsh chemicals or abrasive cleaners, as these can damage the surface of the vinyl and cause it to become discolored or fade over time.
In addition to regular cleaning, it’s also a good idea to protect your vinyl floor from extreme temperatures. This may involve using floor mats to shield the surface from direct sunlight or placing a barrier between the floor and any heat sources. By taking these precautions, you can help to prevent the vinyl from becoming damaged or discolored due to excessive heat or cold.
Finally, be sure to avoid dragging heavy objects across the surface of the vinyl, as this can cause scratches or dents that are difficult to repair. If you need to move heavy items in your car, consider using a dolly or other protective covering to avoid damaging the floor.
By following these simple tips and taking good care of your vinyl floor, you can enjoy its many benefits for years to come. Whether you’re using it in your car or in another part of your home, vinyl is a durable and low-maintenance flooring option that is well worth the investment.
Conclusion: A Durable and Low-Maintenance Solution for Upgrading Your Car’s Interior
In conclusion, installing vinyl flooring in your car is a cost-effective and durable way to upgrade the interior of your vehicle. Whether you’re looking to replace an old, worn-out floor or want to give your car a fresh, new look, vinyl is a great choice that is easy to maintain and resistant to stains and wears.
In this guide, we’ve provided a step-by-step guide to installing vinyl flooring in your car, including instructions for gathering materials, preparing the car, measuring and cutting the vinyl, applying the adhesive, and trimming away excess material. By following these steps and taking your time, you’ll be able to complete the installation process on your own and enjoy the results for years to come.
In addition to the installation process, we’ve also covered the importance of maintaining your vinyl floor and provided tips for keeping it looking its best over time. Whether you’re using it in your car or another part of your home, vinyl is a durable and low-maintenance flooring option that is well worth the investment.
If you’re ready to upgrade the floor in your car and give it a fresh, new look, why not give DIY vinyl flooring a try? With the right tools and a bit of elbow grease, you’ll be well on your way to a professional-looking installation that you can be proud of.
FAQs for Vinyl flooring in a car
What are the benefits of installing vinyl flooring in a car?
There are several benefits to installing vinyl flooring in a car, including durability, ease of maintenance, and cost-effectiveness. Vinyl is resistant to stains, spills, and wear and tear, making it a great choice for busy households or those with young children.
It is also easy to clean and maintain, requiring only a damp cloth and mild detergent to keep it looking like new. And compared to other flooring options like carpet or tile, vinyl is generally more cost-effective, making it a budget-friendly choice for car owners looking to make a change.
Can I install vinyl flooring in my car myself?
Installing vinyl flooring in a car is a relatively straightforward process that the average DIY enthusiast can complete with the right tools and instructions. While some people may prefer to hire a professional, with a bit of patience and attention to detail, most people can successfully install vinyl flooring in their cars on their own.
What tools and materials do I need to install vinyl flooring in my car?
To install vinyl flooring in your car, you’ll need the vinyl flooring itself, as well as adhesive specifically designed for use with vinyl. You’ll also need a few basic tools, including a utility knife or scissors for cutting the vinyl to size, a roller or similar tool for applying the adhesive, and a measuring tape to ensure that the vinyl fits correctly. It is also helpful to have a few optional tools on hand, such as a rubber mallet or heat gun, to make the installation process easier.
How do I prepare my car for vinyl flooring installation?
To prepare your car for vinyl flooring installation, you’ll need to remove any existing floor mats or carpets and clean and dry the surface thoroughly. This will give you a clean, smooth surface to work with and help ensure that the vinyl adheres appropriately. Consider applying a primer or sealant to the surface to improve the adhesion of the vinyl.
How do I maintain my vinyl flooring once it is installed?
Avoid using harsh chemicals or abrasive cleaners, as these can damage the surface of the vinyl. It’s also a good idea to protect your vinyl floor from extreme temperatures and avoid dragging heavy objects across the surface to prevent scratches or dents. By following these simple tips, you can help your vinyl flooring stay looking its best for years to come.